
| 일 | 월 | 화 | 수 | 목 | 금 | 토 |
|---|---|---|---|---|---|---|
| 1 | 2 | 3 | 4 | 5 | 6 | 7 |
| 8 | 9 | 10 | 11 | 12 | 13 | 14 |
| 15 | 16 | 17 | 18 | 19 | 20 | 21 |
| 22 | 23 | 24 | 25 | 26 | 27 | 28 |
| 29 | 30 |
Tags
- 의료 ai 대학원 월급
- 로스트아크
- 활성화 함수
- 자바 영화 api
- 인공지능
- 정규화
- 인공지능 깃 버전관리
- 디자인 패턴
- python
- 딥러닝
- DCP
- 코딩테스트
- Dehaze
- API
- 자바
- MLP
- 경사하강법
- 대학원 월급
- 통계학
- 대학원 급여
- 머신러닝
- C# 프로젝트
- 백준
- pandas
- 파이썬
- 자바 프로젝트
- 디자인패턴
- 파이썬 경사하강법
- 영화 api
- 딥러닝 실험 깃 버전관리
Archives
- Today
- Total
대학원 일기
MNIST 데이터 학습 본문
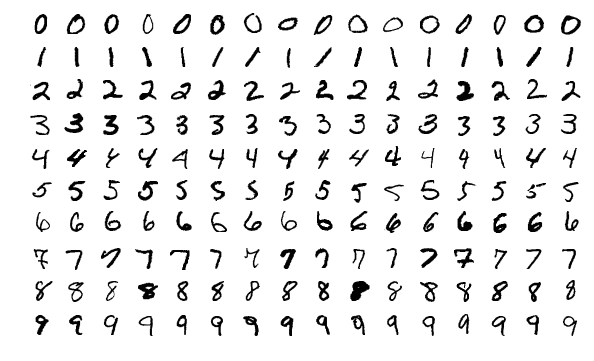
MNIST 데이터
MNIST는 이미지 학습 데이터로 손으로 쓴 숫자로 이루어진 데이터베이스이다. MNIST 데이터셋은 7만개의 숫자로 이루어져 있고 각각의 이미지는 28x28 픽셀로 구성되어 있고, 1 채널의 GrayScale 이미지이다.
 |
 |
MNIST 데이터셋 불러오기
- torchvision.datasets 패키지를 통해 MINIST를 가져온다.
- DataLoader를 통해 MNIST 데이터셋을 불러온다.
import torch
import torch.nn as nn
import torchvision.datasets as dset
import torchvision.transforms as transforms
from torch.utils.data import DataLoader

training_epochs = 15 # training 반복 횟수
batch_size = 100

root = './data'
mnist_train = dset.MNIST(root=root, train=True, transform=transforms.ToTensor(), download=True)
mnist_test = dset.MNIST(root=root, train=False, transform=transforms.ToTensor(), download=True)

train_loader = torch.utils.data.DataLoader(DataLoader = mnist_train, batch_size = 64, shuffle=True, drop_last=True)
test_loader = torch.utils.data.DataLoader(DataLoader = mnist_test, batch_size = 64, shuffle=True, drop_last=True)
MNIST
- root: MNIST 데이터가 어느 경로에 있는지
- train: True 시 train(훈련) 데이터를 불러오고, False 시 test 데이터를 불러온다.
- transform: MNIST를 불러올 때 어느 transform을 적용할 지 선택
- download: root 경로에 MNIST 데이터가 존재하지 않는다면 다운을 받는다는 의미
DataLoader
- DataLoader: 어떤 데이터를 Load할 것인지
- batch_size: MNIST 데이터를 불러올 때 몇 개씩 잘라서 불러올지
- shuffle: 순서를 섞어서 무작위로 불러올 지 선택(무작위: True, 정순: False)
- drop_last: batch_size로 자르고 남은 데이터들을 사용할 지 선택
학습 모델 세팅(Softmax 분류기)
-torch.nn을 통해 다양한 함수 사용
# MNIST 입력의 크기는 28 x 28 = 784
device = torch.device('cuda' if torch.cuda.is_available() else 'cpu')
linear = torch.nn.Linear(784, 10, bias=True).to(device)
torch.nn.init.uniform_(linear.weight) # 균일 분포(a,b)로 텐서를 초기화
# torch.nn.init.normal_(linear.weight)도 가능(정규분포)

# Loss fn - Cross Entropy Loss(비용 함수, 내부적으로 소프트맥스 함수를 포함)
criterion = torch.nn.CrossEntropyLoss().to(device)
# optimizer - SGD(옵티마이저)
optimizer = torch.optim.SGD(linear.parameters(), lr = 0.1)
- 파이토치에서는 CrossEntropyLoss()가 Softmax를 자동으로 계산해줌
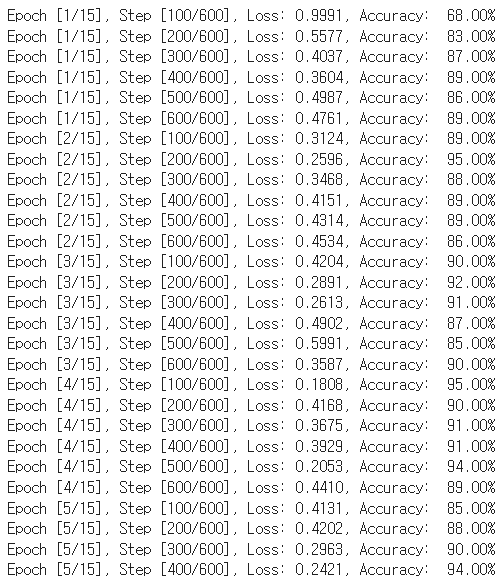
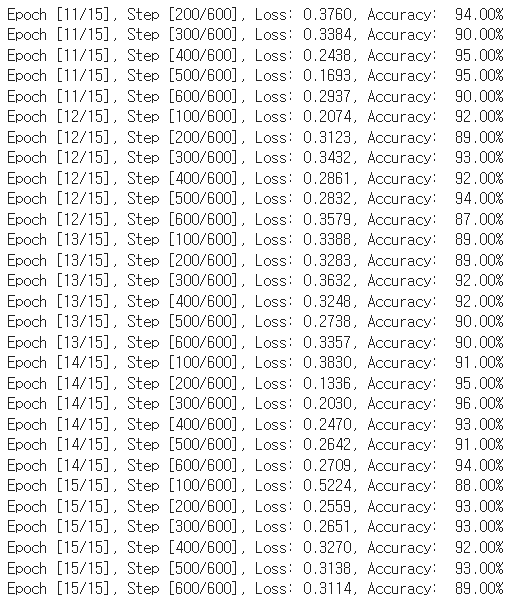
학습 모델 구현(Softmax 분류기)
for epoch in range(training_epochs):
  for i, (imgs, labels) in enumerate(train_loader):
    imgs, labels = imgs.to(device), labels.to(device)
    imgs = imgs.view(-1, 28*28)

    outputs = linear(imgs)
    loss = criterion(outputs, labels)

    optimizer.zero_grad()
    loss.backward()
    optimizer.step()

    _, argmax = torch.max(outputs, 1)
    accuracy = (labels == argmax).float().mean()

    if(i+1) % 100 == 0:
      print('Epoch [{}/{}], Step [{}/{}], Loss: {:.4f}, Accuracy: {: .2f}%'.format(
        epoch+1, training_epochs, i+1, len(train_loader), loss.item(), accuracy.item() * 100))
 |
 |
결과(Test)
-torch.no_grad: grad 계산을 하지 않겠다는 의미
linear.eval()
with torch.no_grad():
  correct = 0
  total = 0
  for i, (imgs, labels) in enumerate(test_loader):
    imgs, labels = imgs.to(device), labels.to(device)
    imgs = imgs.view(-1, 28 * 28)
    outputs = linear(imgs)
    _, argmax = torch.max(outputs, 1)
    total += imgs.size(0)
    correct += (labels == argmax).sum().item()

  print('Test accuracy for {} images: {: .2f}%'.format(total, correct / total * 100))
Visualization
import matplotlib.pyplot as plt
import random

r = random.randint(0, len(mnist_test) - 1)
X_single_data = mnist_test.test_data[r : r + 1].view(-1, 28 * 28).float().to(device)
Y_single_data = mnist_test.test_labels[r: r + 1].to(device)

print("Label: ", Y_single_data.item())
single_prediction = linear(X_single_data)
print("Prediction: ", torch.argmax(single_prediction, 1).item())

plt.imshow(mnist_test.test_data[r:r+1].view(28,28), cmap="Greys", interpolation="nearest")
plt.show()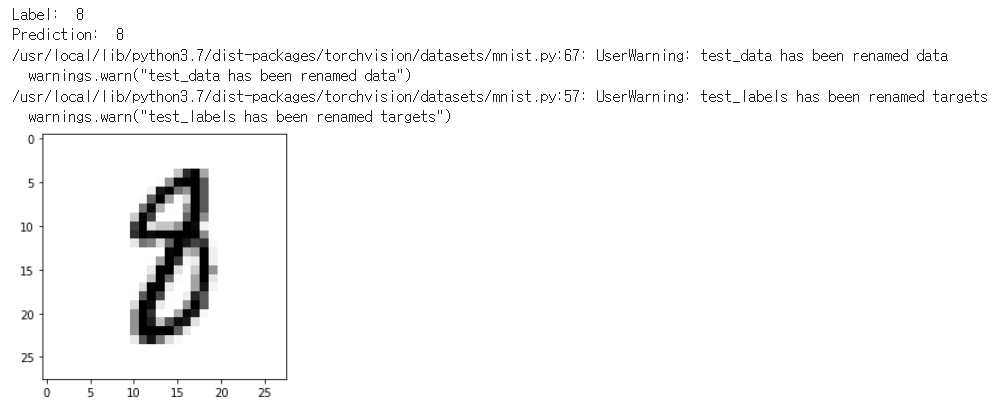
'AI > 인공지능 기초' 카테고리의 다른 글
| 딥러닝: 최적화(Optimization) (0) | 2022.03.07 |
|---|---|
| 딥러닝(Deep learning) 서사 (0) | 2022.03.07 |
| Machine Learning & Pytorch(Tensor Manipulation) (0) | 2022.02.22 |
| 파이썬 시각화툴(Matplotlib) (0) | 2022.02.14 |
| pandas II (0) | 2022.02.13 |
'AI/인공지능 기초' Related Articles
more


Comments